Online Material - Part 1
Welcome to the online material for Part 1 of the Introduction to Research Computing on Kubernetes workshop.
In this part we will cover:
- What is the National Research Platform?
- What is Kubernetes?
- How can we interact with the Kubernetes API?
- What are the common Kubernetes objects?
- Nodes
- Pods
- Jobs
- Volumes
In the next part we will looks at more complicated use-cases: building deployments and building simple science gateways.
National Research Platform
The National Research Platform (NRP) is a partnership of more than 50 institutions, led by UCSD that administer a distributed Kubernetes cluster called Nautilus. It is supported in part though NSF awards.
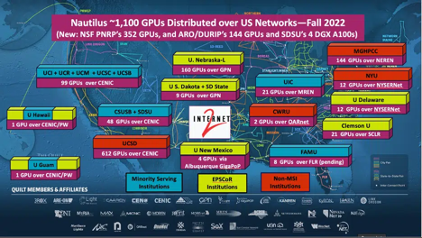
Three nodes are hosted at Clemson. We are not limited to running on just these nodes. As US researchers, we can get free access to run on any non-dedicated node as long as we are following the Cluster Guidelines.
If you do make use of Nautilus, be sure to acknowledge support from NRP.
Nautilus features:
- 307 nodes
- 1300 GPUs
- 7 FPGAs
- 2 ARM nodes
- HA Proxy Ingress
- Over 4PB of storage in Ceph
They have extensive documentation as well as support using the Matrix chat platform.
Kubernetes
Kubernetes is a container orchestration platform. It provides many production grade features including service discovery, load balancing, automatic rollouts, automatic failovers (self-healing), secret management, scaling automation, and batch execution.
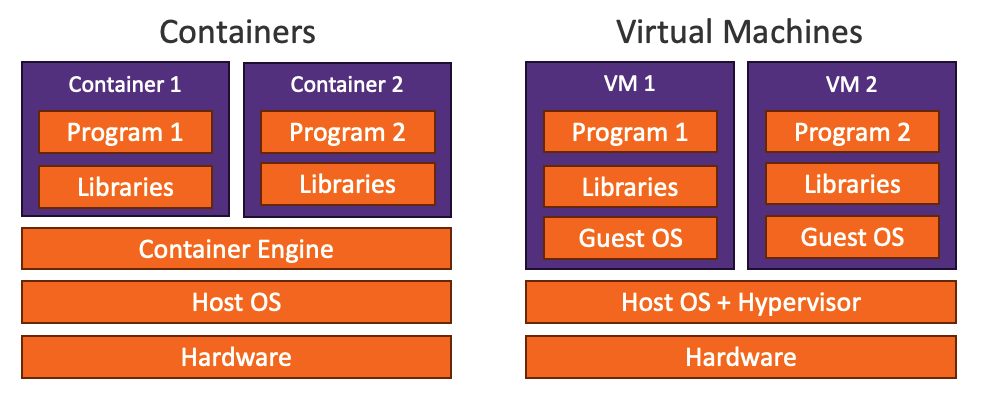
Containers provide a method to encapsulate a program and its dependencies into a single portable entity. It provides a similar level of encapsulation as virtual machines but it is more efficient since each running container uses the same Linux kernel.
Containers images:
- Are portable – a single entity contains all dependencies so you can just move this entity around to which ever compute node you want
- Run predictably – when all dependencies are encapsulated, running becomes predictable (which helps with reproducible research)
These features are key to Kubernetes success.
Kubernetes vs Batch Schedulers
Kubernetes was designed for a different goal than most HPC batch schedulers. For example, if we compare Kubernetes to PBS (the scheduler on Palmetto Cluster):
- Kubernetes is designed for resource rich environments. It does not very gracefully handle having long queues of jobs waiting for resources.
- Kubernetes scheduler is not designed for fair-share or user accounting.
- Kubernetes does not natively handle MPI.
- Kubernetes runs containerized jobs only.
- Kubernetes provides many primitives that HPC schedulers don't. In particular it provides ways to effectively run long lived services (e.g. databases and web services).
- Kubernetes is incredibly extensible. Many of the short comings listed here for Kubernetes can be changed and fixed. For example,
Kubernetes Components
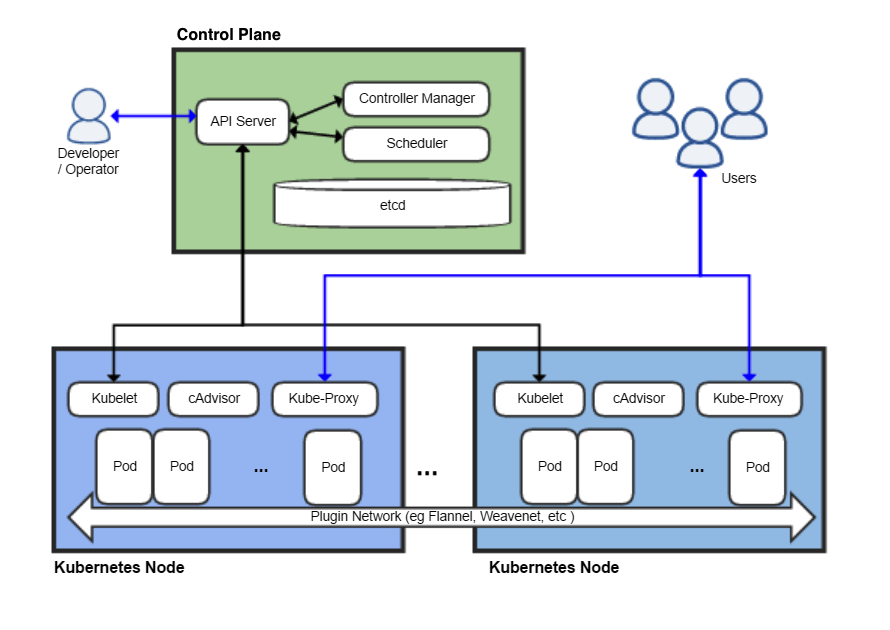
The diagram above shows a Kubernetes cluster with its various system components:
- Control Plane: A node (or series of nodes) that do not run workloads. Instead, they run the API servers, databases, and other critical infrastructure needed by Kubernetes.
- API Server: this exposes the Kubernetes API (Application Programming Interface). Developers will interact with the API to request deployments.
etcd: Consistent and highly-available key-value storage, used to store all cluster system data.- Scheduler: Watches for newly created Pods with no assigned nodes and selects an appropriate node to run on.
- Controller Manager: Contains the various system controllers, for example:
- Node controller: Monitors node health and responds when nodes become unhealthy
- Job controller: Monitors for Job objects and creates Pods as needed to fulfil the Job.
kubelet: An agent that runs on each node. It creates containers as needed for the Pods scheduled for the node.- Kube-Proxy: A network proxy that maintains the various network rules needed to allow or prohibit communication between Pods, and implementing the Service Kubernetes object.
- Pod: The smallest deployable unit of computing (this is where your workload runs).
Connecting to the NRP
-
Login to NRP using your Clemson Credentials (select Clemson University as your identity provider).
-
Click the "Get Config" link in the upper right corner of the screen to download a file "config".
-
Install kubectl and the the config file:
Mac
Open a terminal and run the following commands to create a new workshop folder, and install
kubectl.mkdir nrp-workshop
cd nrp-workshop
curl -LO "https://dl.k8s.io/release/v1.25.15/bin/darwin/amd64/kubectl"
chmod +x kubectl
mkdir -p ~/.kube
mv ~/Downloads/config ~/.kube/configLinux
Open a terminal and run the following commands to create a new workshop folder, and install
kubectl.mkdir nrp-workshop
cd nrp-workshop
curl -LO "https://dl.k8s.io/release/v1.25.15/bin/linux/amd64/kubectl"
chmod +x kubectl
mkdir -p ~/.kube
mv ~/Downloads/config ~/.kube/configWindows Create a directory where you will work on this workshop. Download kubectl into this directory.
Open Windows PowerShell then run:
mkdir nrp-workshop
cd nrp-workshop
curl.exe -LO https://dl.k8s.io/release/v1.25.15/bin/windows/amd64/kubectl.exe
mkdir ~/.kube
mv <download-directory>/config ~/.kube/config -
Test
kubectland the connection to NRP. Run:./kubectl versionYou should see something like the following returned:
WARNING: This version information is deprecated and will be replaced with the output from kubectl version --short.  Use --output=yaml|json to get the full version.
Client Version: version.Info{Major:"1", Minor:"25", GitVersion:"v1.25.15", GitCommit:"da6089da4974a0a180c226c9353e1921fa3c248a", GitTreeState:"clean", BuildDate:"2023-10-18T13:40:02Z", GoVersion:"go1.20.10", Compiler:"gc", Platform:"windows/amd64"}
Kustomize Version: v4.5.7
Server Version: version.Info{Major:"1", Minor:"25", GitVersion:"v1.25.12", GitCommit:"ba490f01df1945d0567348b271c79a2aece7f623", GitTreeState:"clean", BuildDate:"2023-07-19T12:17:23Z", GoVersion:"go1.20.6", Compiler:"gc", Platform:"linux/amd64"}
If you see both versions for client and server, than you have successfully connected to NRP!
-
Check access to the workshop namespace. At this point, the instructor will add all workshop attendees to the workshop namespace. Once all attendees have been added, we can now check that we can query pods in the
clemson-nrp-workshopnamespace:./kubectl config set-context --current --namespace=clemson-nrp-workshop
./kubectl get podsYou should see no errors. Instead you should see something like:
No resources found in clemson-nrp-workshop namespace.
Break
Basic Kubernetes Objects
At a basic level, the way Kubernetes works is you use the API to create/delete/update certain Kubernetes objects that represent your desired state. The controllers will constantly monitor the desired state against what is currently running and attempt to fix any differences. We will look at some common Kubernetes objects. These objects can all be created, listed, inspected, updated, and deleted using the kubectl command:
- Create:
kubectl create <resource type name> <args> - Delete:
kubectl delete <resource type name> <resource name> - List:
kubectl get <resource type name> - Describe:
kubectl describe <resource type name> <resource name>
Namespaces
Namespaces provide a logical organization unit for most Kubernetes objects. Most
objects (Pods, Deployments, Services, Volume Claims, etc.) live in a single
namespace. We will work out of the clemson-nrp-workshop namespace. On NRP, you
must request administrative rights to create namespaces. Once you are an admin
and create a namespace you can invite other users to join the namespace. You are
responsible for everything in the namespace. Creating and modifying namespaces
happens in the Nautilus Web Portal. Our kubectl accounts do not have access to
manipulate Namespace objects.
Node
A node is a physical host (like a compute node in Palmetto) upon which pods are scheduled. Nodes have resources available (CPU/Memory/GPU) as well as features.
We can get a list of all nodes in Nautilus by running:
./kubectl get nodes
We can look for nodes with a particular label. For example, these nodes have the
label of topology.kubernetes.io/zone=clemson (the nodes hosted in the Clemson
data center all have this label):
./kubectl get nodes -l topology.kubernetes.io/zone=clemson
We see a much shorter list, only three nodes:
NAME                      STATUS   ROLES    AGE      VERSION
epic001.clemson.edu       Ready    <none>   2y209d   v1.25.12
k8s-3090-01.clemson.edu   Ready    <none>   574d     v1.25.12
k8s-3090-02.clemson.edu   Ready    <none>   557d     v1.25.12
We can use the describe command to see the details on a particular node:
./kubectl describe node k8s-3090-01.clemson.edu
We see tons of features, many automatically generated based on CPU and GPU information. We'll see later that we can use node labels to influence how our pods will be scheduled. We also see capacity information:
Capacity:
  cpu:                            28
  devices.kubevirt.io/kvm:        1k
  devices.kubevirt.io/sev:        0
  devices.kubevirt.io/tun:        1k
  devices.kubevirt.io/vhost-net:  1k
  ephemeral-storage:              1036003076Ki
  hugepages-1Gi:                  0
  hugepages-2Mi:                  0
  memory:                         263790920Ki
  nvidia.com/gpu:                 5
  pods:                           110
  smarter-devices/fuse:           20
  smarter-devices/vfio:           20
  smarter-devices/vfio_vfio:      20
This is a 28 core machine with 5 GPUs (NVIDIA-GeForce-RTX-3090).
We can also see the current allocations:
Allocated resources:
  (Total limits may be over 100 percent, i.e., overcommitted.)
  Resource                       Requests        Limits
  --------                       --------        ------
  cpu                            13390m (47%)    33220m (118%)
  memory                         128691Mi (49%)  358718Mi (139%)
  ephemeral-storage              0 (0%)          0 (0%)
  hugepages-1Gi                  0 (0%)          0 (0%)
  hugepages-2Mi                  0 (0%)          0 (0%)
  devices.kubevirt.io/kvm        0               0
  devices.kubevirt.io/sev        0               0
  devices.kubevirt.io/tun        0               0
  devices.kubevirt.io/vhost-net  0               0
  nvidia.com/gpu                 1               1
  smarter-devices/fuse           0               0
  smarter-devices/vfio           0               0
  smarter-devices/vfio_vfio      0               0
Note: unlike PBS, Kubernetes has a difference between "requests" and "limits". Limits can be over committed.
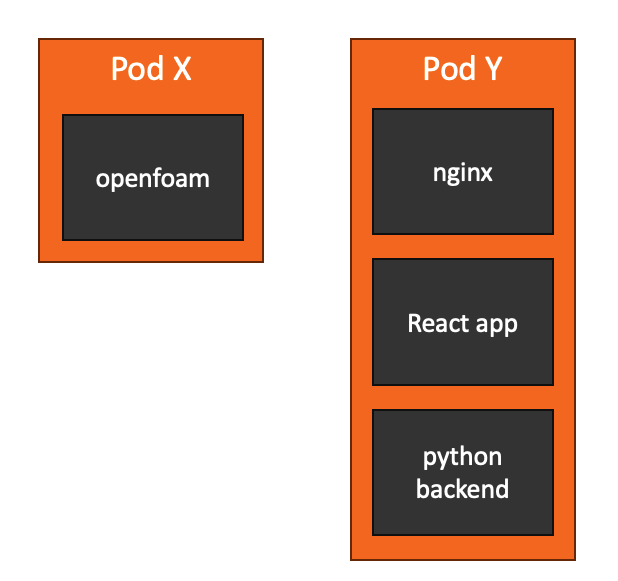
Pod
Kubernetes’s basic compute unit is a pod. A pod is a collection of one or more containers that will be scheduled on the same node and share the same network namespace.
Let's create our first Kubernetes object. Copy the following contents to a new file called "pod1.yaml" in your nrp-workshop directory.
Resource names must have unique names, so many of the examples here will have "USERNAME" in the name. Replace this with your username to help make sure you have a unique name. If you don't, you might see an error like:
Error from server (AlreadyExists): error when creating "pod1.yaml": pods "test-pod-dndawso" already exists
apiVersion: v1
kind: Pod
metadata:
  name: test-pod-USERNAME
spec:
  containers:
    - name: mypod
      image: ubuntu
      resources:
        limits:
          memory: 100Mi
          cpu: 100m
        requests:
          memory: 100Mi
          cpu: 100m
      command: ["sh", "-c", "echo 'I am a new pod' && sleep infinity"]
Notes on this file:
- We typically specify Kubernetes objects as YAML files. YAML files do have some gotchas.
- All Kubernetes objects have an
apiVersion,kind, andmetadatafield. - Pod name is in the
metadata.namefield - Pods can have multiple containers. This one has just one:
- An Ubuntu image that just echos a phrase then sleeps.
- It is limited to 100Mi RAM and 100 millicpus (one tenth of a core).
Then you can spawn the pod with:
./kubectl create -f pod1.yaml
If things went smoothly, you should see something like:
pod/test-pod-dndawso created
List the running pods in the namespace with:
./kubectl get pods
Get details about the pod with:
./kubectl describe pod test-pod-USERNAME
Get logs from the pod with:
./kubectl logs test-pod-USERNAME
It should print:
I am a new pod
We can execute new processes interactively in the pod by running:
./kubectl exec -it test-pod-USERNAME -- /bin/bash
Now you are running inside the pod. You can play around in it. Let's check admin rights by installing iproute2.
apt update
apt install iproute2
ip addr
exit
Now let's delete the pod:
./kubectl delete pod test-pod-USERNAME
Make sure it no longer show up when you list pods:
./kubectl get pod
Being able to create Pods is a critical first step, but you typically use higher level abstractions. Pods are designed as relatively ephemeral, disposable entities.
Job
A Job creates one or more Pods based on a Pod specification and will automatically handle retries, creating new Pods as needed.
Save the following file as "job1.yaml":
apiVersion: batch/v1
kind: Job
metadata:
  name: pi-USERNAME
spec:
  template:
    spec:
      containers:
        - name: pi
          image: perl:5.34.0
          command: ["perl", "-Mbignum=bpi", "-wle", "print bpi(2000)"]
          resources:
            limits:
              memory: 100Mi
              cpu: 1000m
            requests:
              memory: 100Mi
              cpu: 100m
      restartPolicy: Never
  backoffLimit: 4
Create the job with:
./kubectl create -f job1.yaml
You can list all jobs with
./kubectl get job
Initially, you will see that it is not complete:
NAME         COMPLETIONS   DURATION   AGE
pi-dndawso   0/1           6s         6s
You can confirm that this Job automatically spawned a Pod and that it is still running:
$ ./kubectl get pod
NAME               READY   STATUS              RESTARTS   AGE
pi-dndawso-pwn6z   0/1     ContainerCreating   0          19s
Once the Job is complete, you can see that with by checking Pods and Jobs:
$ ./kubectl get pod
NAME               READY   STATUS      RESTARTS   AGE
pi-dndawso-pwn6z   0/1     Completed   0          2m42s

~/Downloads/nrp-workshop    (⎈ |nautilus:clemson-nrp-workshop)
$ ./kubectl get job
NAME         COMPLETIONS   DURATION   AGE
pi-dndawso   1/1           71s        2m52s
We can take a look at the logs from that automatically generated Pod (substitute
the USERNAME and RANDOM based on the pods listed with get pods:
./kubectl logs pi-USERNAME-RANDOM
You should see many digits of Pi.
Make sure you delete your Job. Any Pods created should be automatically cleaned up:
./kubectl delete job pi-USERNAME
Volumes
So far, everything we have ran is ephemeral. Any files you create inside a Pod is removed when the Pod gets deleted. To persist files we should use Volumes. Volumes have two parts. The first is a cluster wide Volume resource, and then a Namespace will a have a PersistentVolumeClaim (PVC). The PVC binds the Volume to our namespace and allows it to be mounted in our Pods. In Nautilus, they have volume provisioners that will automatically create the Volume, when you create an appropriate PVC.
Let's test this by creating a 1GB PVC. Create a file called "pvc1.yaml":
apiVersion: v1
kind: PersistentVolumeClaim
metadata:
  name: test-vol-USERNAME
spec:
  storageClassName: rook-ceph-block-east
  accessModes:
    - ReadWriteOnce
  resources:
    requests:
      storage: 1Gi
Use kubectl to create it:
./kubectl create -f pvc1.yaml
We can check the status of our PVC by running:
./kubectl get pvc
We should see the STATUS field report Bound for our PVC. This indicates that a
volume was appropriately created and bound. For details, we can use describe:
./kubectl describe pvc test-vol-USERNAME
In my case, I see that it is bound to :
Volume: pvc-a3b61a26-7f5c-4772-a7a1-d4cee46dd9c5
We do not have permission to look at details of the underlying volume:
$ ./kubectl describe volume pvc-a3b61a26-7f5c-4772-a7a1-d4cee46dd9c5
Error from server (Forbidden): volumes.rook.io "pvc-a3b61a26-7f5c-4772-a7a1-d4cee46dd9c5" is forbidden: User "http://cilogon.org/serverE/users/18990" cannot get resource "volumes" in API group "rook.io" in the namespace "clemson-nrp-workshop"
Let's now create a Pod that can mount this volume at the path /mnt/test. Save
the following as pod2.yaml:
apiVersion: v1
kind: Pod
metadata:
  name: test-pod-USERNAME
spec:
  containers:
    - name: mypod
      image: ubuntu
      resources:
        limits:
          memory: 100Mi
          cpu: 100m
        requests:
          memory: 100Mi
          cpu: 100m
      command: ["sh", "-c", "ls /mnt/test && sleep infinity"]
      volumeMounts:
        - mountPath: /mnt/test
          name: test-vol
  volumes:
    - name: test-vol
      persistentVolumeClaim:
        claimName: test-vol-USERNAME
Create the pod:
./kubectl create -f pod2.yaml
Connect to the pod:
./kubectl exec -it test-pod-USERNAME -- /bin/bash
Check the contents of the mount, create a new file, and then exit the pod:
cd /mnt/test
ls
echo "Hello World" > hello.txt
ls
exit
Then delete the pod and recreate it:
./kubectl delete pod test-pod-USERNAME
./kubectl get pod # wait for pod to be fully terminated
./kubectl create -f pod2.yaml
Connect to the pod:
./kubectl exec -it test-pod-USERNAME -- /bin/bash
Check the contents of the mount. The hello.txt file should still exist!
cd /mnt/test
ls
cat hello.txt
Cleanup
It is important that you clean up PVCs if they are no longer in use. Let's go ahead and delete this test-vol and test-pod:
./kubectl delete pod test-pod-USERNAME
./kubectl delete pvc test-vol-USERNAME
OpenFOAM
Let us run a more complete example. We will run the
incompressibleFlud/pitzDailySteady OpenFOAM tutorial. We'll need to create
three Kubernetes objects:
- PersistentVolumeClaim: We'll need a way to gather the results in a persistent location so we can analyze the results once the job is complete.
- ConfigMap: We need to mount a script within the OpenFOAM image so we can specify the commands to run. Kubernetes has a neat object called a ConfigMap that allows us to embed short files right inside the Kubernetes object. It gets mounted into the Pod in the same way a Volume can.
- Job: We will use a job to spawn the Pod and handle retries.
It can often be helpful to have multiple objects within the same file. YAML
allows us to do this by separating each object with a line of ---. Save the
following as run-of.yaml (remember to replace instances of USERNAME):
apiVersion: v1
kind: PersistentVolumeClaim
metadata:
  name: of-data-USERNAME
spec:
  storageClassName: rook-ceph-block-east
  accessModes:
    - ReadWriteOnce
  resources:
    requests:
      storage: 2Gi
---
apiVersion: v1
kind: ConfigMap
metadata:
  name: of-script-USERNAME
data:
  run.sh: |
    source /opt/openfoam11/etc/bashrc
    set -e
    mkdir $FOAM_RUN
    cd $FOAM_RUN
    cp -r $FOAM_TUTORIALS/incompressibleFluid/pitzDailySteady .
    cd pitzDailySteady
    ./Allrun
    cp -r . /mnt/data/pitzDailySteady
---
apiVersion: batch/v1
kind: Job
metadata:
  name: of-run-USERNAME
spec:
  template:
    spec:
      initContainers:
        - name: changeowner
          image: busybox
          command: ["sh", "-c", "chmod -R 777 /mnt/data"]
          volumeMounts:
            - name: data
              mountPath: "/mnt/data"
      containers:
        - name: of-run
          image: openfoam/openfoam11-paraview510
          command: ["sh", "-c", "/entry.sh /home/openfoam/run.sh"]
          resources:
            limits:
              memory: 200Mi
              cpu: 1000m
            requests:
              memory: 50Mi
              cpu: 1000m
          volumeMounts:
            - name: script
              mountPath: "/home/openfoam/run.sh"
              subPath: "run.sh"
              readOnly: true
            - name: data
              mountPath: "/mnt/data"
      volumes:
        - name: script
          configMap:
            name: of-script-USERNAME
        - name: data
          persistentVolumeClaim:
            claimName: of-data-USERNAME
      affinity:
        nodeAffinity:
          requiredDuringSchedulingIgnoredDuringExecution:
            nodeSelectorTerms:
              - matchExpressions:
                  - key: topology.kubernetes.io/region
                    operator: In
                    values:
                      - us-east
      restartPolicy: Never
  backoffLimit: 2
Then create all the resources within the file using:
./kubectl create -f run-of.yaml
This should create all the resources needed and begin to run OpenFOAM.
Once we are all done, we can clean up all the resources with:
./kubectl delete -f run-of.yaml